back to tutorial index
back to homepage

![]()
back
to tutorial index
back
to homepage
If you are new to SourceForge setting up a new project, and especially setting up CVS for that project can be quite a daunting task. This tutorial will guide you through the worst of it, and give you pointers to any problems you may encounter along the way.
When you create a project in SourceForge a CVS repository is automatically created for you, into which you can place anything you wish. Although CVS is designed primarily for source code, it can equally be used to store websites, documentation and binary files. All the server side work has been done for you automatically, all that remains is configuring your machine for CVS and uploading your project source code. I'll assume you already have CVS set up on your machine, if you don't look at my tutorial "Setting up your computer for CVS access".
To once you have a working CVS connection, you need to do 2 things:
It's the second part that gets most people. Importing and the reasons behind it are covered in the CVS basics tutorial, so I'll now just go through carry out this task. I'll assume your using the latest version of WinCVS, which is at the time of writing is 1.1b15 - where things differ for version 1.0.6 I'll highlight it. If you are using an older version I highly recommend upgrading, ignore the warnings about beta code, it's been as solid as a rock for me.
Actually, importing your code is quite simple. You must choose first change the browser window to the explorer window in v1.1 by clicking the Explore tab on the right hand side. [1.0.6 users must choose the menu CVS Admin | Import Module... and choose the directory there] and navigating your way to the directory that contains your code. All your code should be under one root directory ideally, although you can if you wish import multiple modules by repeating these steps. For now, we'll just concentrate on 1 module which should be enough for most projects - you can always make more later:
![[Screenshot of explore tab]](tutorial_explore.gif)
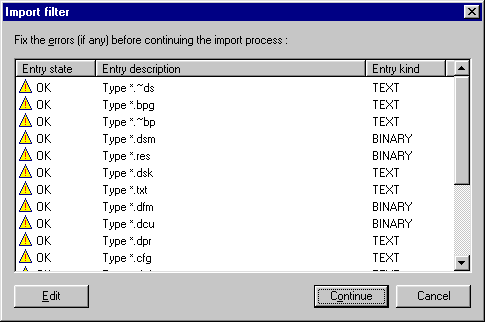
Now you should have selected the directory that you wish to import into the repository in the explorer pane of WinCVS or selected the directory from the dialog box in earlier versions. For v1.1 you must now select the Create | Import module from selection menu option, which will take you to the following dialog box.

This dialog box is VERY important - it lets you tell CVS which file types are binary and which are text. This is an important distinction because of the way CVS handles files, if you tell it a file is text it does odd things with line breaks, but more importantly enables a set of rather neat merge features. If a file is specified as binary then these features are not available. It's important to get this right first time, although as you can see here WinCVS guesses the type and mostly gets it right. It's probably best to check though. This screenshot shows what a Delphi import might look like.
Once you have checked the file types and clicked continue you will see the "Import Settings" dialog. This lets you specify important information, I'll take you through the fields one by one.
- Module name and path: This is essential because it gives the name of the module. You can just type in a name here, for instance it's probably a good idea to call your module something relevant - the name of your project perhaps? Main, CoreCode? It's up to you. Just make sure it's unique, although obviously if this is your first time it's going to be unique anyway right?
- Vendor and Release tags - you can leave these at their defaults. They are used to tag the modules files at first import.
- Log message - log messages are important, but as this is the first important you can just put in "initial import" or whatever.
Then hit OK, and off it goes!
Finally, you need to checkout the code again into a working directory. To do this use the checkout command under the Create or CVS Admin menu. More details can be found in the CVS Access tutorial.